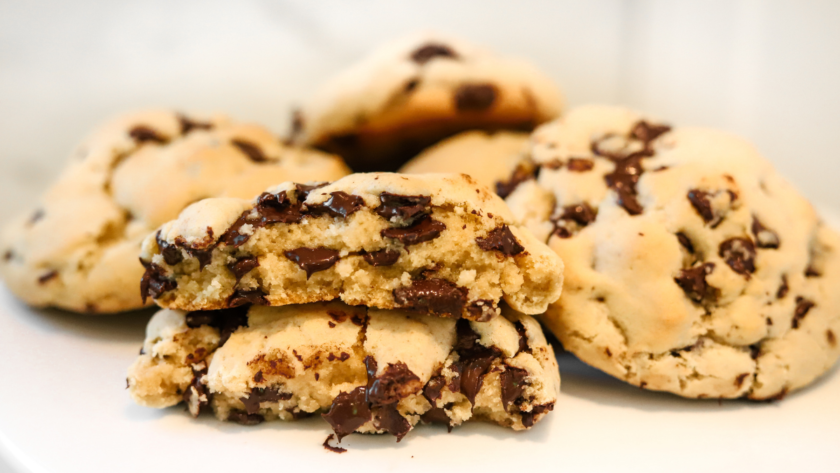
Enter the world of freshly baked, chewy, and delicious chocolate chip cookies. Nothing is more comforting than the smell of freshly made cookies filling your home and tempting you to take pleasure in the traditional combination of buttery dough and creamy chocolate. Together, let’s set off on a lovely journey to make these classic delicacies!
- Ingredients
- Tips
- How to make Chocolate chip cookie
- Troubleshooting & Flavor Variations
- Pairing and serving suggestions
- Cookie Extra suggestions
- FAQ
- Butter: Provides flavor, moisture, and richness to the cookies. In its melted form, it contributes to a chewier texture.
- Granulated Sugar: Adds sweetness and helps to spread the cookies, contributing to crispiness. Also, the sugar helps with caramelization, which aids in achieving crispy edges.
- Brown Sugar: Adds moisture, depth of flavor, and chewiness to the cookies due to its higher molasses content compared to granulated sugar.
- Eggs: Act as a binding agent, providing structure to the dough. They also contribute to the cookies’ chewiness and moisture.
- Vanilla Extract: Enhances the overall flavor profile of the cookies, adding a subtle depth and aroma.
- All-Purpose Flour: Provides structure and stability to the cookies. The gluten in the flour contributes to the chewiness of the dough.
- Baking Soda: Helps the cookies to rise and spread, contributing to their texture and ensuring they have the right amount of chewiness and crispiness.
- Salt: Balances the sweetness and enhances the overall flavor of the cookies.
- Chocolate Chips: Adds bursts of chocolate flavor and texture to the cookies, melting slightly while baking and contributing to the overall chewiness.
- Use melted but cooled butter for a chewier texture.
- For uniform cookies, use a cookie scoop to measure out dough portions.
1. Preparing the Cookie Dough:
- Preheat the oven to 375°F (190°C).
- In a mixing bowl, whisk together the melted and cooled butter, granulated sugar, and brown sugar until smooth and creamy.
- Beat in the eggs, one at a time, followed by the vanilla extract.
2. Mixing Dry Ingredients:
- In a separate bowl, combine the all-purpose flour, baking soda, and salt.
3. Combining Wet and Dry Ingredients:
- Gradually add the dry ingredients to the wet ingredients, mixing until just combined. Do not overmix.
- Gently fold in the chocolate chips until evenly distributed throughout the dough.
4. Scooping and Baking:
- Using a cookie scoop or spoon, drop rounded tablespoons of dough onto the prepared baking sheets, leaving space between each cookie for spreading.
- For chewy centers, bake for 10-12 minutes until the cookies are set but slightly soft in the middle. For crispy edges, bake for 12-15 minutes until the edges turn golden brown.
- Remove from the oven and let the cookies cool on the baking sheets for a few minutes before transferring them to a wire rack to cool completely.
- Adjusting Texture: For chewier cookies, add an extra egg yolk to the dough. For crispier cookies, bake them for a longer duration.
- Variations: Try adding chopped nuts or different types of chocolate chips for flavor variations.
- Pair these amazing chocolate chip cookies with a glass of cold milk or a scoop of vanilla ice cream for a delightful dessert.
Creating Cookie Sandwiches:
If you’re looking to create a cookie-based dessert, such as sandwich cookies or cookie cups, here’s a suggestion:
- Choose Filling: Decide on a filling such as frosting, ganache, peanut butter, or jam that pairs well with the cookies.
- Matching Cookies: Match cookies of similar size and shape to create sandwich pairs.
- Spread Filling: Spread a layer of your chosen filling on the flat side of one cookie in each pair.
- Sandwich Together: Gently press another cookie on top of the filling, creating a sandwich.
- Optional Decorating: Roll the sides of the sandwich in sprinkles, mini chocolate chips, or chopped nuts for added texture and decoration.
Remember to consider the size and thickness of the cookies when creating sandwiches to ensure they fit well together and the filling is evenly distributed.
For cookie cups, if desired:
- Pressing into Muffin Tin: Mold the warm, freshly baked cookies into the cups of a muffin tin while they’re still warm and pliable, gently pressing and shaping them to form cups.
- Cooling: Allow the formed cups to cool completely in the muffin tin before carefully removing them.
- Filling the Cups: Fill the cooled cookie cups with your choice of fillings, such as pudding, whipped cream, ice cream, or fruit.
Q: Can I use salted butter instead of unsalted butter in this recipe?
Yes, you can use salted butter, but consider adjusting the added salt in the recipe to balance the overall saltiness.
Q: Can I freeze the cookie dough?
Absolutely! You can prepare the cookie dough ahead of time, wrap it tightly, and freeze it for up to 1-2 months. Thaw it in the refrigerator before baking.
Q: How can I make the cookies softer or crispier?
For softer cookies, reduce the baking time slightly, and for crisper cookies, extend the baking time by a few minutes.
Q: Can I substitute other types of sugar for the brown sugar?
Brown sugar contributes to the chewiness of the cookies due to its moisture content and flavor. You can substitute with granulated sugar, but it may alter the texture and taste slightly.
Q: How do I store the baked cookies?
Store the cooled cookies in an airtight container at room temperature for up to 3-5 days for optimal freshness.
Q: Can I use different types of chocolate chips?
Absolutely! Experiment with different types of chocolate chips, such as milk, dark, or white chocolate, or mix in chopped nuts or dried fruits for variety.
Q: How can I prevent cookies from spreading too much?
Chilling the dough before baking helps reduce spreading. Also, avoid placing cookie dough on warm baking sheets.
Q: Can I make smaller or larger cookies?
Yes, you can adjust the cookie size by using smaller or larger portions of dough. Adjust baking time accordingly.
Q: How can I achieve a consistent shape for the cookies?
Using a cookie scoop or measuring the dough portions with a spoon helps maintain consistent cookie sizes for even baking.
Q: Can I add other flavorings to the dough?
Absolutely! Consider adding spices like cinnamon or a splash of almond extract for additional flavor nuances.

Chocolate Chip Cookie
Equipment
- Mixing bowls
- Electric mixer or stand mixer
- Baking sheets lined with parchment paper
- Cookie scoop or spoon
Ingredients
- 1 cup unsalted butter melted and cooled
- 1 cup granulated sugar
- ½ cup packed light brown sugar
- 2 large eggs at room temperature
- 1 tsp vanilla extract
- 2¼ cups all-purpose flour
- 1 tsp baking soda
- ½ tsp salt
- 2 cups semi-sweet chocolate chips
Instructions
1. Preparing the Cookie Dough:
- Preheat the oven to 375°F (190°C).
- In a mixing bowl, whisk together the melted and cooled butter, granulated sugar, and brown sugar until smooth and creamy.
- Beat in the eggs, one at a time, followed by the vanilla extract.
2. Mixing Dry Ingredients:
- In a separate bowl, combine the all-purpose flour, baking soda, and salt.
3. Combining Wet and Dry Ingredients:
- Gradually add the dry ingredients to the wet ingredients, mixing until just combined. Do not over-mix.
- Gently fold in the chocolate chips until evenly distributed throughout the dough.
4. Scooping and Baking:
- Using a cookie scoop or spoon, drop rounded tablespoons of dough onto the prepared baking sheets, leaving space between each cookie for spreading.
- For chewy centers, bake for 10-12 minutes until the cookies are set but slightly soft in the middle. For crispy edges, bake for 12-15 minutes until the edges turn golden brown.
- Remove from the oven and let the cookies cool on the baking sheets for a few minutes before transferring them to a wire rack to cool completely.
Notes
- The cookie dough can be prepared in advance and refrigerated or frozen for later use.
- After preparing the dough, wrap it tightly in plastic wrap, shaping it into a disc for easier handling.
- Refrigerate the cookie dough for up to 3 days or freeze it for up to 1-2 months. If frozen, thaw the dough in the refrigerator before using.
- Portion the cookie dough into individual cookie-sized balls before refrigerating or freezing.
- Arrange the cookie dough balls on a baking sheet lined with parchment paper and freeze them until solid. Once frozen, transfer the dough balls to a freezer-safe container or zip-lock bag for easy storage.
- Label and date the container or bag for reference.
- If you plan to bake the cookies later, you can pre-bake the cookies and store them.
- Once baked and completely cooled, store the cookies in an airtight container at room temperature for up to 3-5 days. To maintain their texture, consider adding a piece of bread or apple slice to the container to absorb excess moisture.